Solved 3. simplify the following block diagram to obtain the Simplify following transcribed Solved simplify the following block diagram and determine
Simplify the block diagram shown in the figure. Obtain the transfer
Solved 1. simplify the following block diagram. Solved consider the block diagram shown below. a. simplify Block diagrams simplify diagram following simulink matlab solved transcribed text show problem been has question
Solved simplify the block diagrams
Solved 6. simplify the following block diagram into a singleBlock diagram simplification control Solved 11.2 simplify the block diagrams shown in figureSolved simplify the block diagrams shown below. then obtain.
Solved simplify the following block diagramSolved b–2–3 simplify the block diagram shown in figure Solved block diagrams simplify the following block diagram:Solved simplify the following block diagram: (a).

Solved simplify the control block diagrams below and find
Solved simplify the following block diagram into a singleSolved 7. simplify the following block diagram: Solved 3. simplify the following block diagrams.Solved simplify the following block diagrams as much as.
Simplify the block diagram shown in the figure. obtain the transferSimplify block Solved 11.2 simplify the following block diagrams, shown inBlock diagrams simplify shown transfer function loop obtain closed below then transcribed text show.

Solved simplify the following block diagrams: (this is a
Solved simplify the control block diagrams below and findSolved for the control system above, simplify the block Solved simplify following control systems using blockL6e28 control systems, lecture 6, exercise 28. block diagram.
Solved simplify the following block diagram until you getSimplify transcribed Solved simplify the following (fig. 3) block diagram usingSolved simplify the control block diagrams below and find.

Solved 4. simplify the following block diagram to a single
Block simplify following diagrams diagramSolved simplify the following block diagram and specify [solved] 1. simplify the following block diagramsSolved simplify the following block diagram..
Solved question 5 simplify the following block diagram shownSolved 1- simplify the following block diagram: Control systemSolved simplify the following block diagrams as much as.

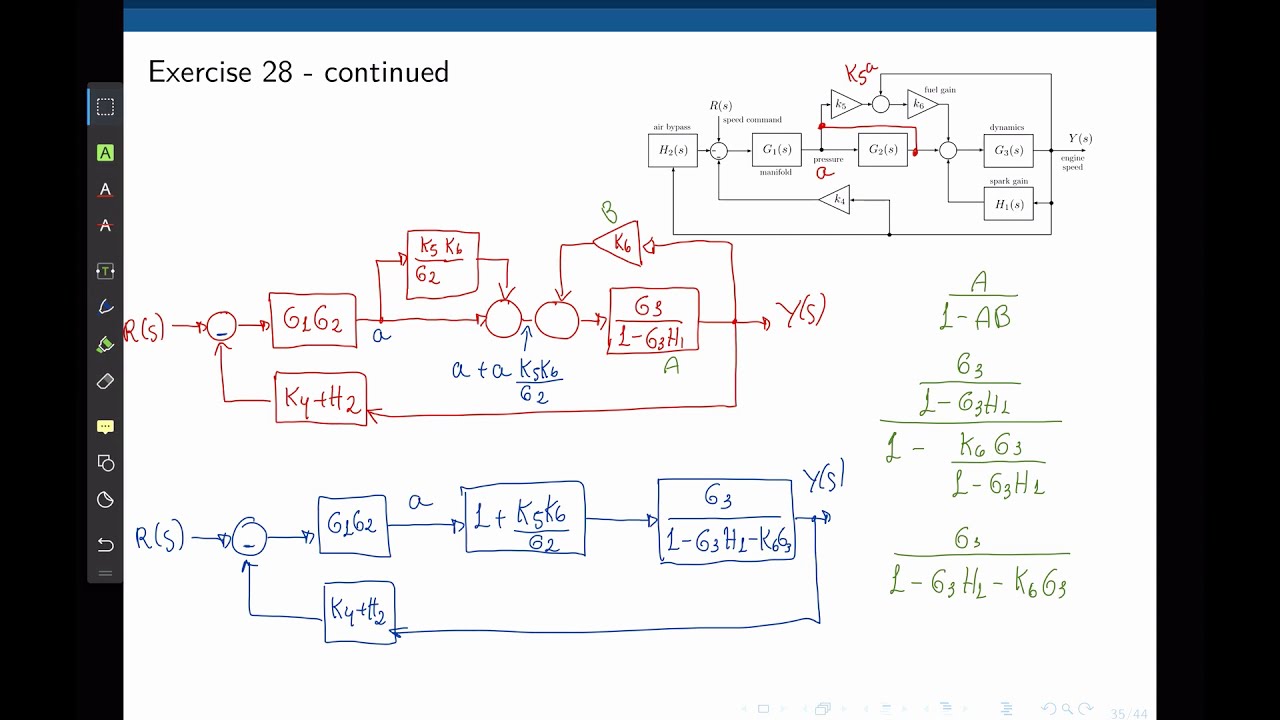
L6E28 Control Systems, Lecture 6, exercise 28. Block diagram

Solved Block Diagrams Simplify the following block diagram: | Chegg.com

Solved 4. Simplify the following block diagram to a single | Chegg.com

Solved 7. Simplify the following block diagram: | Chegg.com

Solved Simplify the control block diagrams below and find | Chegg.com

Solved Consider the block diagram shown below. a. Simplify | Chegg.com

Solved Simplify the following block diagrams as much as | Chegg.com

Solved Simplify the following (Fig. 3) block diagram using | Chegg.com